Sunday, January 30, 2011

GRMC part 4-finished

I stole some time this week from the production line to build a new seatstay mitering jig. It took more time than I expected, but was worth the effort. Now the painstaking process of getting the seatstays just right with a file, is a 5 minutes trip to the mill. Nice.

So here's the next few steps in the process.

Fit the chainstays to the dropouts, and check spacing in the chainstay jig.


Next weld the chainstay to the dropout. In this case its a breezer style without a replaceable hanger. Normally on a MTB I'd suggest a replaceable hanger, but this is for the wife, and will mostly see just gravel, so no worries.


Put everything back in the jig and miter the Bottom Bracket junction.


Then weld on the chainstays, checking alignment all the way. It helps to have a perfectly straight wheel to stick in there a couple time during the process.


And here is part of the chainstay jig I built this week. It make a huge difference! Its rock solid.


Notice the tight miters it produces. Makes welding them a snap.


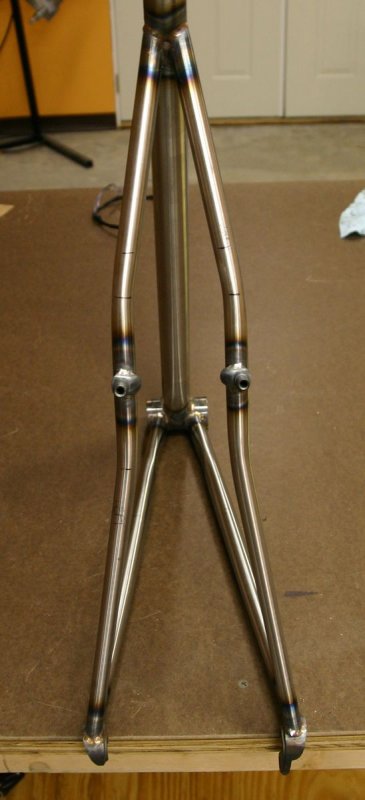
And the finish product with the disk brake mount, chainstay bridge and disk brake bridge installed. All that is left is to ream the seat-tube and headtube, then braze on the bottle mounts and cable stops and its off to paint!

This is bike is for my wife. I don't think anything I've ever made has given me more satisfaction. Most days I couldnt wait until I'd completed a days work, done my "chores", and finished my workout so that I could race down to the man-cave to work on her. My only hope is that it provides her with miles of smiles, and that she enjoys it half as much as I enjoyed building it for her. Love you Kitten!

And that means, ProPam, you are no longer on deck, but up to bat. Better get cracking on that color choice, cause I'm starting on yours tomorrow!

Saturday, January 15, 2011

GRMC part 3

Ok, so the main triangle is welded up. My welding is getting better, but I still have a long way to go.


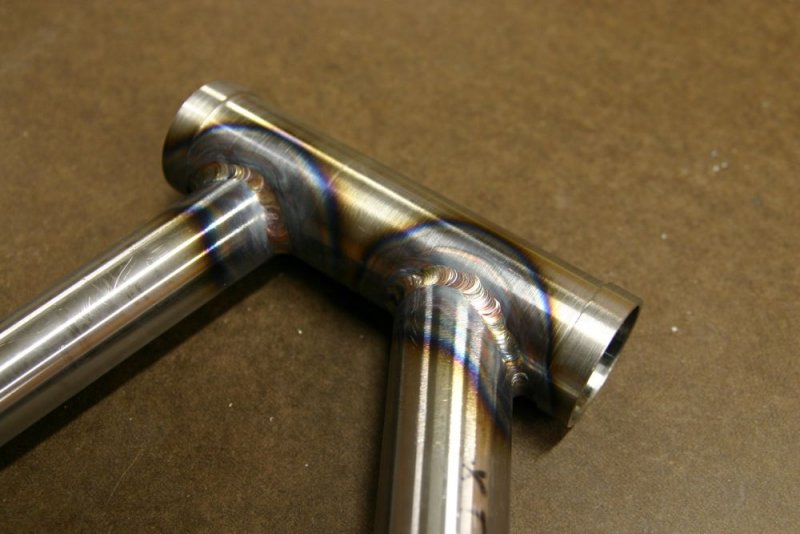
The idea here is to move fast, keep your heat affected zone as small and possible, and if you can, make it pretty too!


Seattube to top tube.


Finished product.


Custom headtube.

Now its back in the jig and start on the rear triangle.

I decided I wanted a different set of rears chainstays for this bike so I placed an order Friday. So it will be mid week before I get back on this one. In the mean time, #003 should be back from paint and ready to buildup Monday. That will keep me busy until then.

Thanks for stoping by.

GRMC part 2

So the next step is the front triangle. First check the main tubes for any defects and label the short butt side.


Second, miter the 90 degree cut on the seat tube to BB junction.


Finish mitering the top and down tube and check the fit. This usually takes a little time with the file to fine tune everything.


Next drill the bottle boss holes, the slot for the seatpost clamp and sand and file the ends of each tube for welding. Clean everything with isopropyl alcohol and your ready to fire up the TIG torch.


First weld is the seattube to BB. The brass piece is the heatsink and back purge I made.


Some nice tight miters ready to tack in the jig.


More to come.

Friday, January 14, 2011

Gravel Road Monster Cross

Starting my wife's gravel road slayer today. There seemed to be some interest out in the inter-webs on how this all happens in the basement of this mad-man. So here it goes:

First, I start every design session with some homebrew to set the mood and get the juices flowing. : ) I do a full size drawing cause I can do it faster than on the 'puter and its nice to have a life size plot to visualize everything. I work up he overall design from studying other manufactures bikes, my own ideas on bike fit and design, and input from the the rider. This bike is going to have a mtn drivetrain, 700c disk wheels, ridged fork and clearance for 44c tires. I'm going for a sturdy, relaxed all day kind of machine, with low BB and long stays for stable handling in loose gravel, and a top tube that fits between flat bar and drops to give her the option. It will not be pink. Should be fun.


Second I face the BB since they come a little ruff from the factory. After the build, very little if any facing is needed.

Then comes the headtube. This ones going to be 120 mm and starts from a big ol chunk of 4130. It gets turned down so that the inside race is 33.9 mm and has some rings on the outside.


Checking the run out before boring the inside race:


Nearing the end of the lathe work:


And the finish product ready for welding.

Next up is setting the frame jig to the drawing, and cutting some tubes for the main triangle.

Stay tuned!

Tuesday, January 11, 2011

Ready for Paint

Mittering the chainstays.


Rear triangle welded up. Check out those custom bent rear stays, oh yeah! Time for the brake bridge, cable stops, and bottle bosses.

Side view and a messy shop.


Saturday, January 1, 2011

Bike #3 = Custom Tange 4130 Cyclocross Killer

Custom head tube in the beginning.


The end result of some time on the lathe.


Seat tube welded on, still in the heat sink/purge device.


Bad pic of the bottle mounts being drilled.


Bottom bracket welds.


Head tube shot.

Maybe tomorrow I'll get the rear triangle welded on.